
Hi3093 Development Board Hands-on Guide (openubmc.cn)
Introduction
openUBMC supports QEMU simulation and debugging. However, there is no efficient debugging method for hardware debugging. After trying many development boards, I summarized some openUBMC startup experience based on the MYC-LHi3093 development board for your reference.
Material Preparation
- Hi3093 core board
- Power adapter of the core board
- Network cable
- Type-C USB cable
- SD card of 8 GB or larger (used to restore the openEuler environment if necessary)
Environment Preparation
The Hi3093 core board is delivered with the openEuler OS by default. We need to replace the openEuler OS with openUBMC RTOS. To do so, complete the following tasks in sequence:
- Customize and create an openUBMC RTOS image.
- Plan and format the core board's storage partitions to ensure compatibility with the openUBMC partition table.
Creating an openUBMC RTOS Image
For details about how to set up the openUBMC development environment, see "Ubuntu Development Environment Setup | openUBMC".
To facilitate subsequent network communication with the core board, you are advised to deploy the Ubuntu environment on a VM and complete all initialization steps in the VM. This section uses VirtualBox to set up the openUBMC development environment.
Follow the following steps to set up the environment and create the openUBMC image:
- Download the Ubuntu 24.04 ISO file and install it in VirtualBox. You are advised to reserve 50 GB storage space.
⭐ If you do not want to manually create a package, you can download the pre-built Hi3093 image to skip the build process. Just place related files in their corresponding directories. The 2506_gx.zip package stores all required files for burning. *.hpm is the HPM package designated for deploying the development board environment.
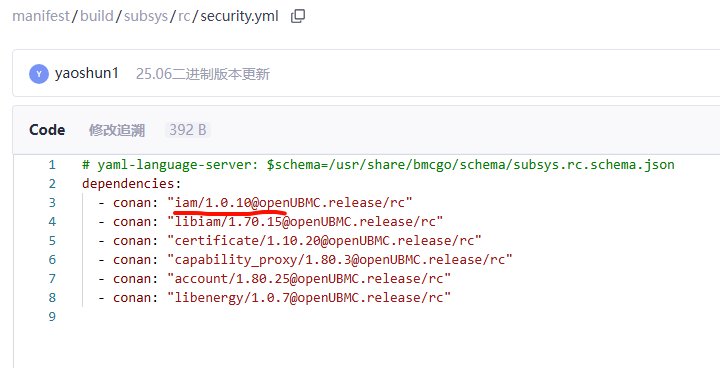
❗ If you manually create a package and use openUBMC 25.03, ensure that the IAM version in the build/subsys/rc/security.yml file is 1.0.1 or later.
- Set up the openUBMC environment following instructions in "Ubuntu Development Environment Setup | openUBMC".
- Install the openUBMC debugging tool busybox and integrate it into manifest.
4.Run the bingo build command in the manifest directory to create the openUBMC image.
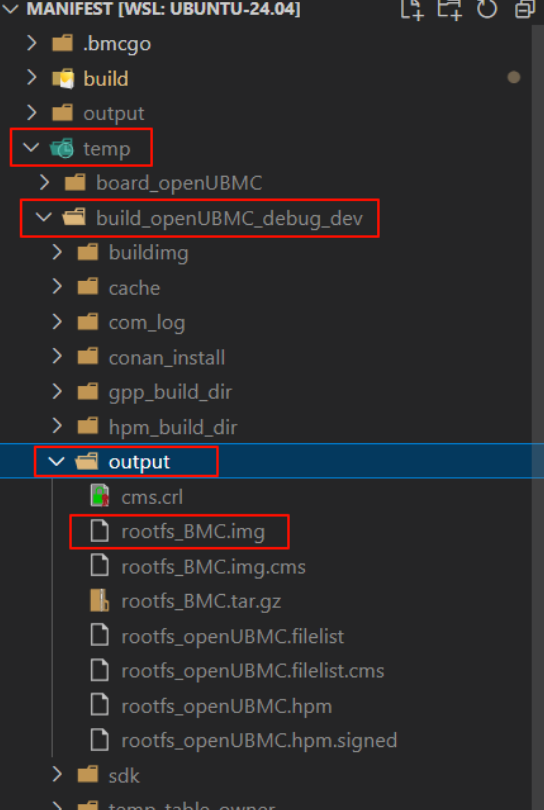
The rootfs_BMC.img image file can be found in temp/build_openUBMC_debug_dev/output.
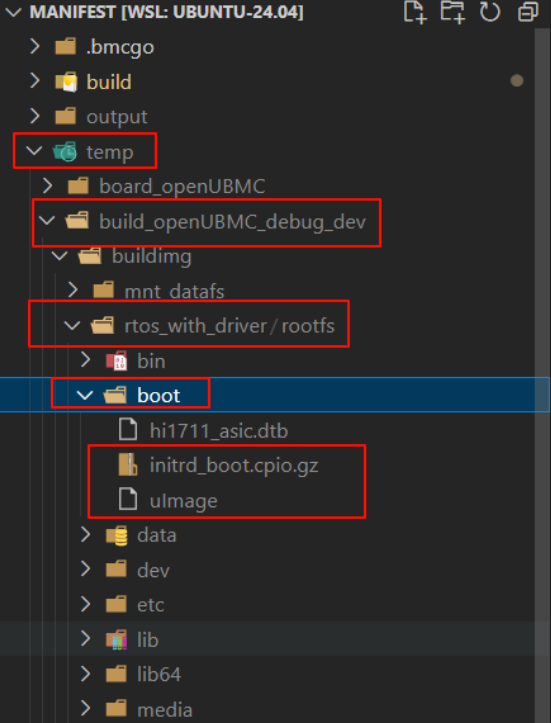
In addition, you need to retrieve initrd_boot.cpio.gz (initial Linux RAM disk image) and uImage (Linux kernel image) from the temp directory.
1.1 Image Burning and Partition Table Configuration
1.1.1 Connecting to the Core Board
We need to connect to the Hi3093 core board through a serial port or other available methods. The following figure shows the core board connection.
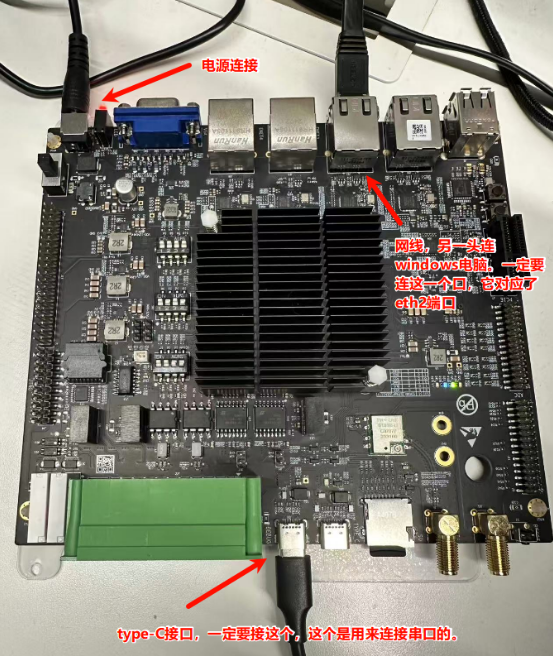
❗ During the connection, strictly follow the instructions in the figure. Otherwise, the subsequent operations will fail.
1.1.2 Starting the Core Board
The core board is started in eMMC boot mode. Set SW2 as follows.
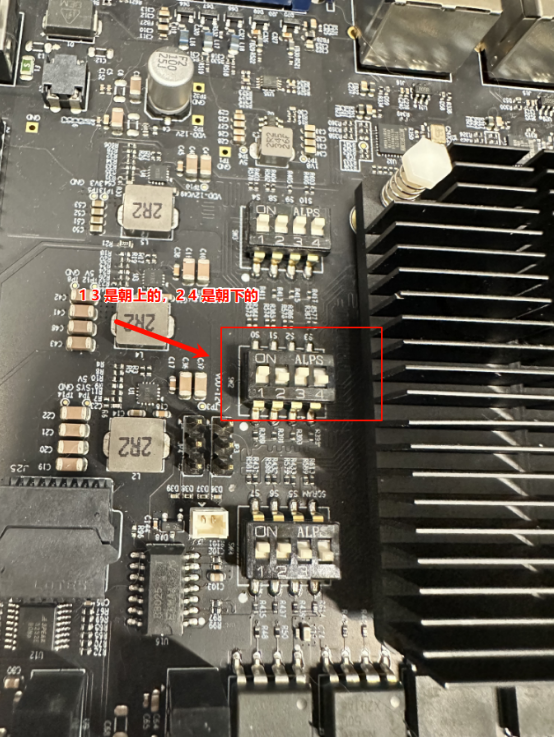
⭐ You can refer to the core board's user manual for details about how to start the core board in eMMC boot mode.
1.1.3 Connecting to the Core Board's Serial Port
After the core board is connected through a Type-C USB cable, you can use serial terminal software to access the serial console interface. Use Xshell to establish a connection.
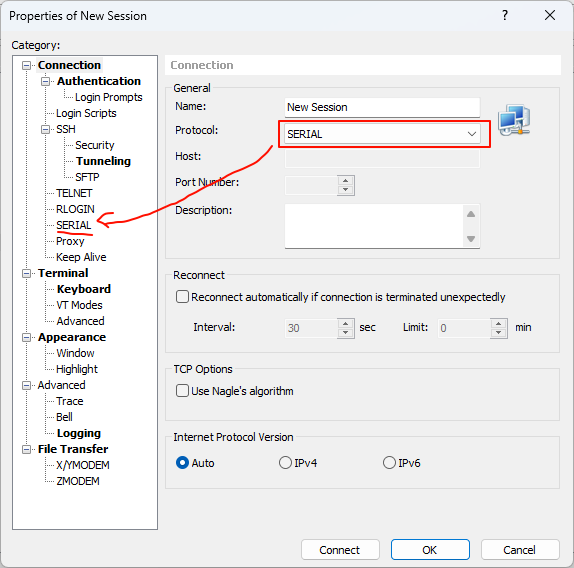
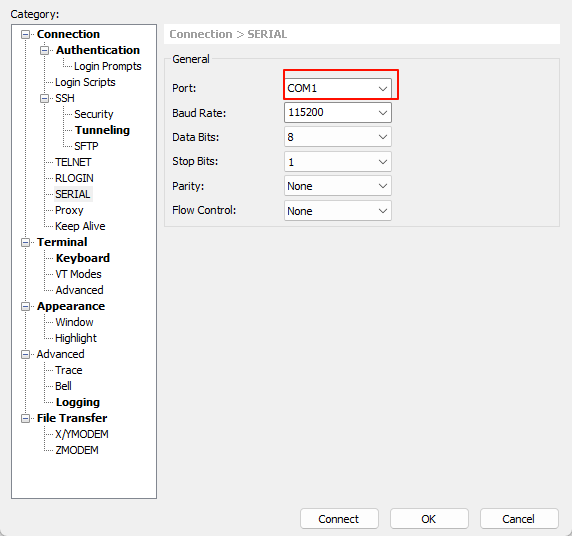
Select the SERIAL connection mode and access the serial console interface. Then, configure the port number. You need to test the COM port number. If the connection is successful, Connected is returned.
1.1.4 Starting and Logging In to the Core Board
After Xshell establishes a connection to the serial port, start the core board. You can view the print in the Xshell serial console.
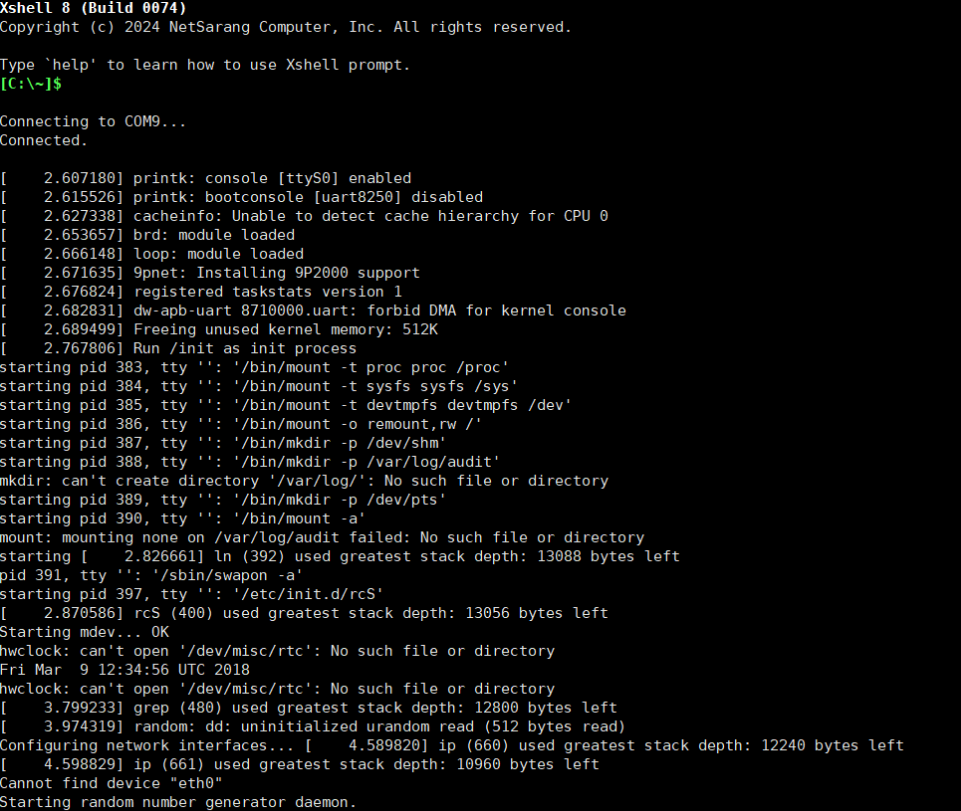
Upon completion of the serial display scrolling, a login prompt will appear. If the serial console remains a blank screen, press the Enter key multiple times to invoke the login interface. If you log in for the first time, the account is root, and the password needs to be manually set (see prompts).

1.1.5 Preparing an SD Card
Subsequent operations will result in modification of the development board's boot image. However, the SPI lacks SSH connectivity. Therefore, you need to prepare an SD card to back up the image. The procedure is as follows:
- Run the
fdisk -lcommand to display available partitions, find the SD card partition, and initialize the partition. (The initialization command is not restricted as long as the development board can identify it, for example, mkfs.vfat.) - Run mount to
mountthe SD card partition to a directory. - Upload the SPI burning file provided by the vendor (MYiR) through SSH and copy the file to the SD card partition.
- If the openEuler environment needs to be restored, you only need to remount the SD card.
1.1.6 Configuring the Partition Table
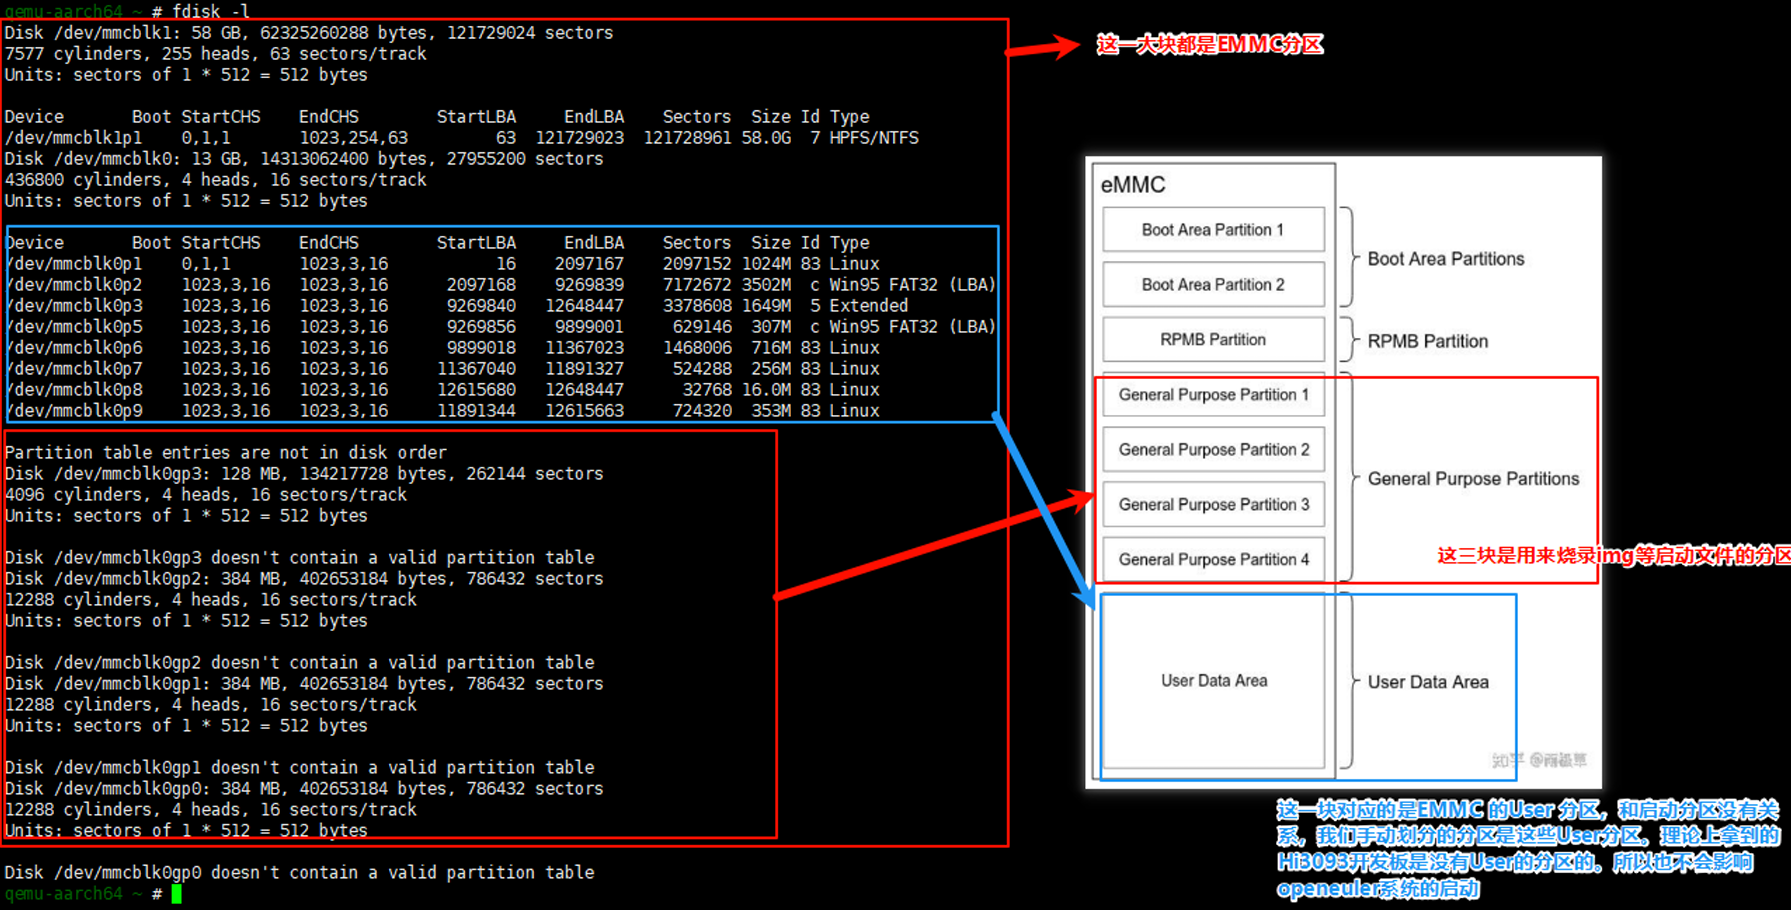
To ensure that the user partition of eMMC can be correctly accessed after openUBMC is started, you need to perform manual partitioning and solidify the partition table in advance. The final partition configuration is as follows:
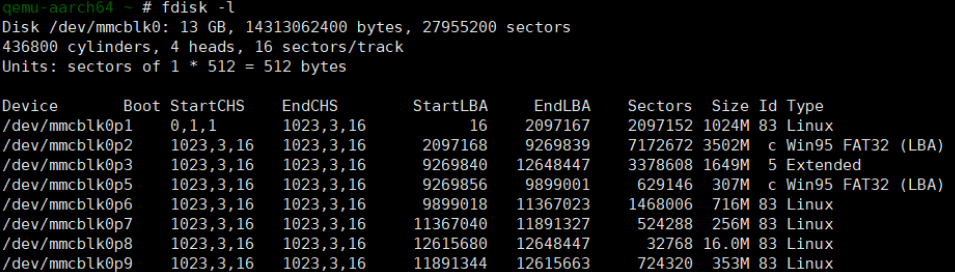
The actions are as follows:
fdisk /dev/mmcblk0

/dev/mmcblk0p1: Execute n, select p to create a primary partition, and input 16 for StartLBA and 2097167 for EndLBA.

/dev/mmcblk0p2: Execute n, select p, and input 2097168 for StartLBA and 9269839 for EndLBA. Then execute t and input c.

/dev/mmcblk0p3: Execute n, select e to create an extended partition, and input 9269840 for StartLBA and 12648447 for EndLBA.

/dev/mmcblk0p5: Execute n, select l to create a logical partition, and input 9269856 for StartLBA and 9899001 for EndLBA. Then execute t and input c.

/dev/mmcblk0p6: Execute n, select l, and input 9899018 for StartLBA and 11367023 for EndLBA.

/dev/mmcblk0p7: Execute n, select l, and input 11367040 for StartLBA and 11891327 for EndLBA.

/dev/mmcblk0p8: Execute n, select l, and input 12615680 for StartLBA and 12648447 for EndLBA.

/dev/mmcblk0p9: Execute n, select l, and input 11891344 for StartLBA and 12615663 for EndLBA.

Then, execute w to save all the configurations.
After the partitions are created, format each partition.
For partitions designated as Win95 FAT32, use the mkfs.vfat utility for formatting, for example, mkfs.vfat /dev/mmcblk0p2.
Other partitions need to be formatted using mkfs.ext4, for example, mkfs.ext4 /dev/mmcblk0p1.
1.1.7 Burning the Image
Core Board Network Configuration
To burn related image files to the core board, you need to upload the image files to the core board using a file transfer mode such as SFTP. Run the ifconfig eth2 up 192.168.1.123 command to configure the network on the core board first.
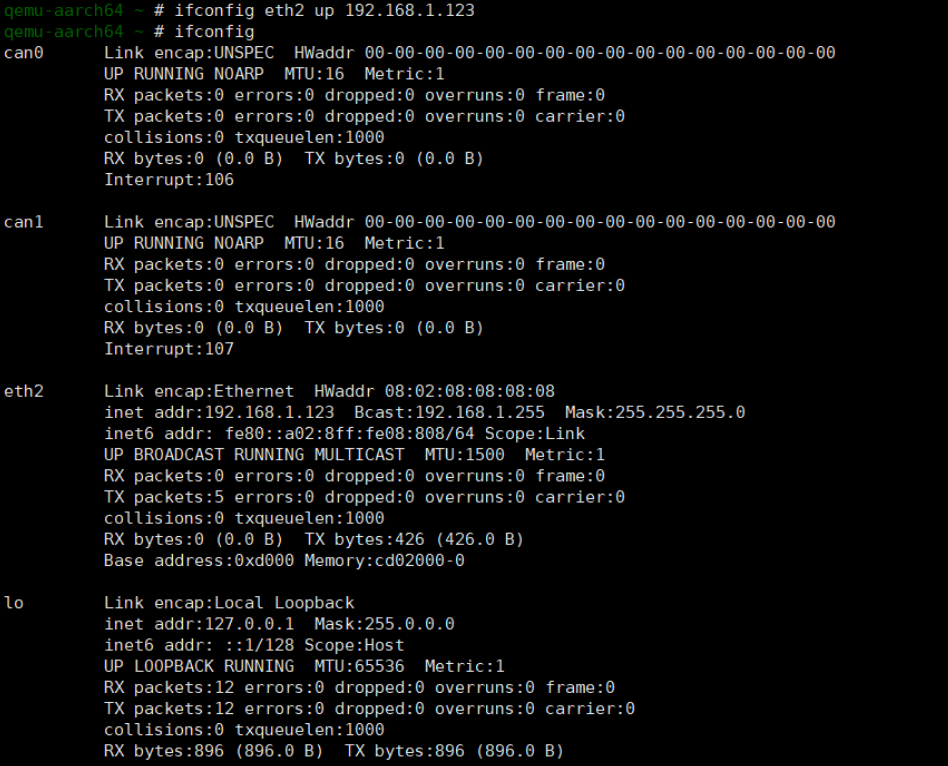
1.1.8 Configuring the Windows Network and Uploading the Image Package
Open the network connection page of Windows. Select the appropriate Ethernet (you need to identify the correct Ethernet interface, which can be determined by removing and inserting the Ethernet cable).
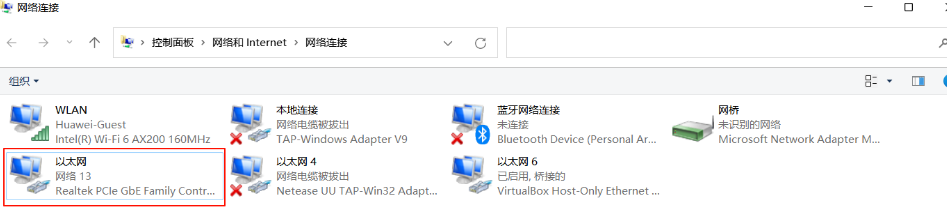
Configure the IP address of the Ethernet to be in the same network segment as the core board.
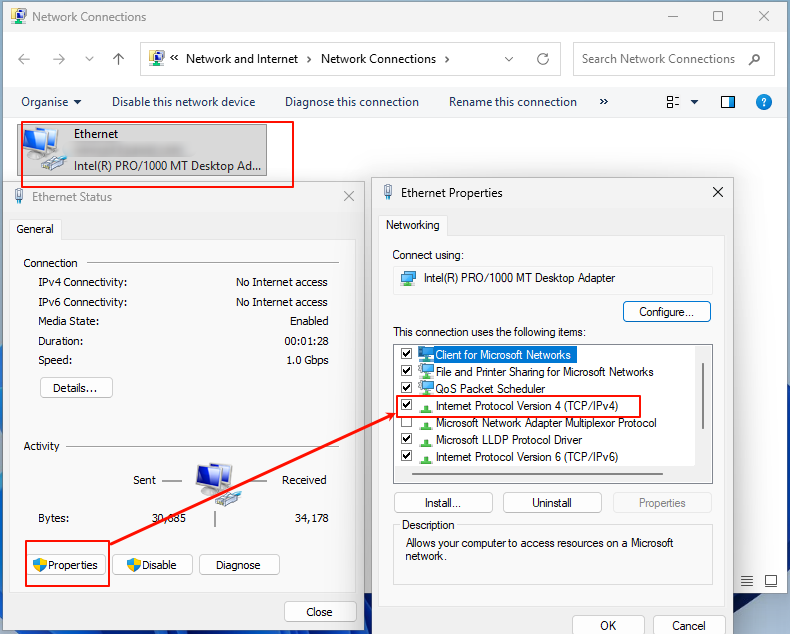
After the configuration, test the network connection on the Windows PC.
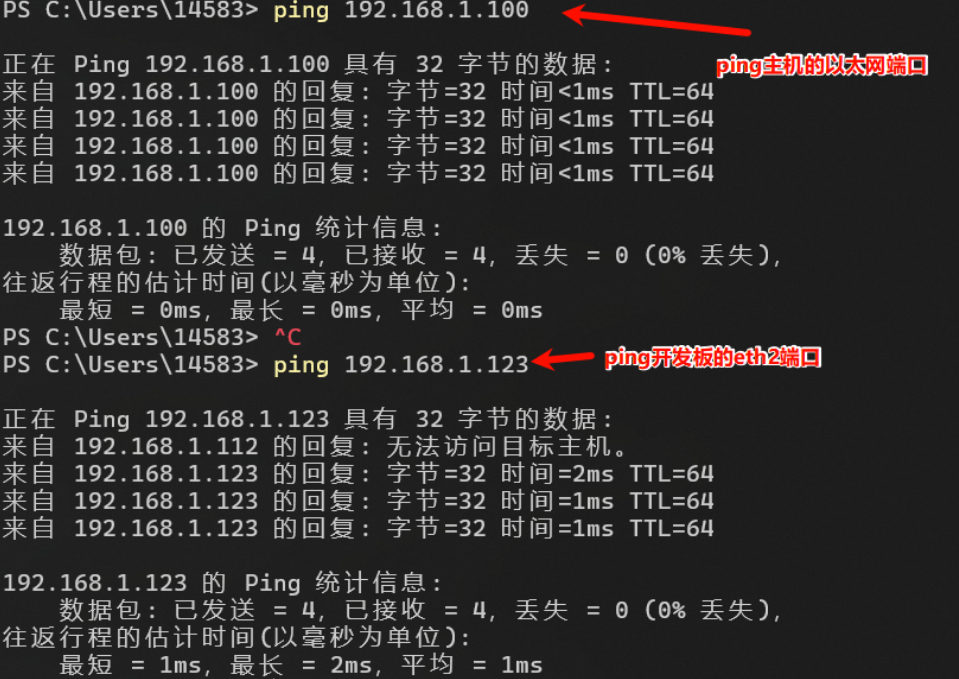
If the preceding print is displayed, the connection is successful. Then, you can upload the image files to the /tmp directory of the core board via SFTP. This transfer can be performed using Xshell's SFTP functionality or WinSCP. The following uses WinSCP as an example:
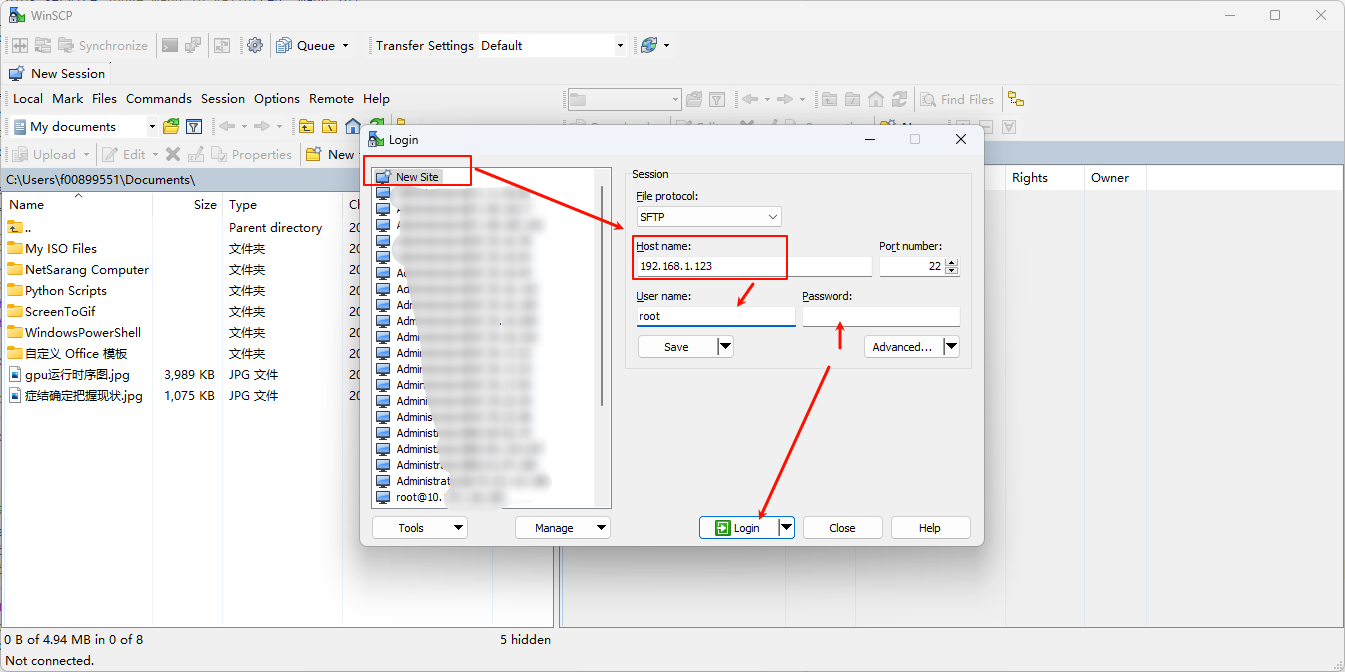
After the connection is successful, upload the following files in MYD-LHI3093-V2\SoftwareFiles\02-Images. ⭐ The files are core board documents provided by MYiR. Upload the openUBMC image package rootfs_BMC.img to the /tmp directory and rename the package Hi3093_ext4fs.img.
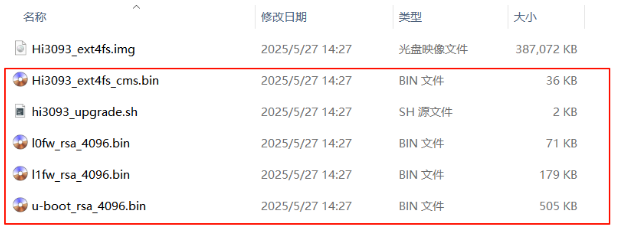
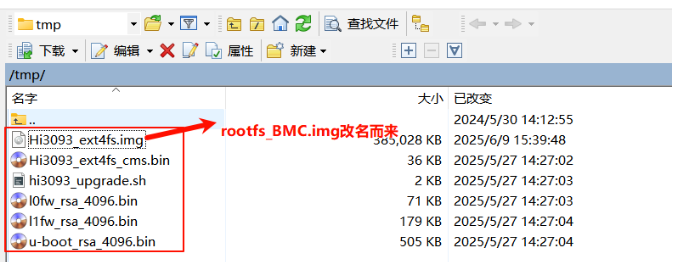
Image Package Burning
Hi3093 provides an upgrade script. You only need to perform the following procedure through the serial console interface of the core board to complete the upgrade.
qemu-aarch64 ~ # cd /tmp/
qemu-aarch64 /tmp # ls
Hi3093_ext4fs.img      hi3093_upgrade.sh  l1fw_rsa_4096.bin
Hi3093_ext4fs_cms.bin  l0fw_rsa_4096.bin  u-boot_rsa_4096.bin
qemu-aarch64 /tmp # /hi3093_upgrade.sh 4096
/dev/mmcblk0gp0
/dev/mmcblk0gp2
/dev/mmcblk0gp1
update temp L0FW...
70+1 records in
70+1 records out
72088 bytes (72 kB, 70 KiB) copied, 0.0156561 s, 4.6 MB/s
update temp L1FW...
178+1 records in
178+1 records out
182876 bytes (183 kB, 179 KiB) copied, 0.0365372 s, 5.0 MB/s
update temp u-boot...
504+1 records in
504+1 records out
516616 bytes (517 kB, 505 KiB) copied, 0.111703 s, 4.6 MB/s
update temp rootfs_hdr...
36+0 records in
36+0 records out
36864 bytes (37 kB, 36 KiB) copied, 0.00683788 s, 5.4 MB/s
update temp rootfs...
376+1 records in
376+1 records out
394268672 bytes (394 MB, 376 MiB) copied, 2.40696 s, 164 MB/s
emmc update success, please reboot your board...
The "`emmc update success, please reboot your board...``" message indicates that the burning is successful. Before rebooting the board, download the /boot/hi1711_asci.dtb file on the core board to the Windows PC as a backup over SSH.
Run the reboot command. Note that the reboot does not mean that the openUBMC image is successfully upgraded. You need to modify the U-Boot configuration to load initrd_boot.cpio.gz and uImage of openUBMC.
1.1.8.1 U-Boot Configuration Modification
Since only the image file has been modified, and the Linux kernel's uImage file remains unchanged, replacement must be executed via TFTP. After the reboot, press Enter until the U-Boot configuration page is displayed.
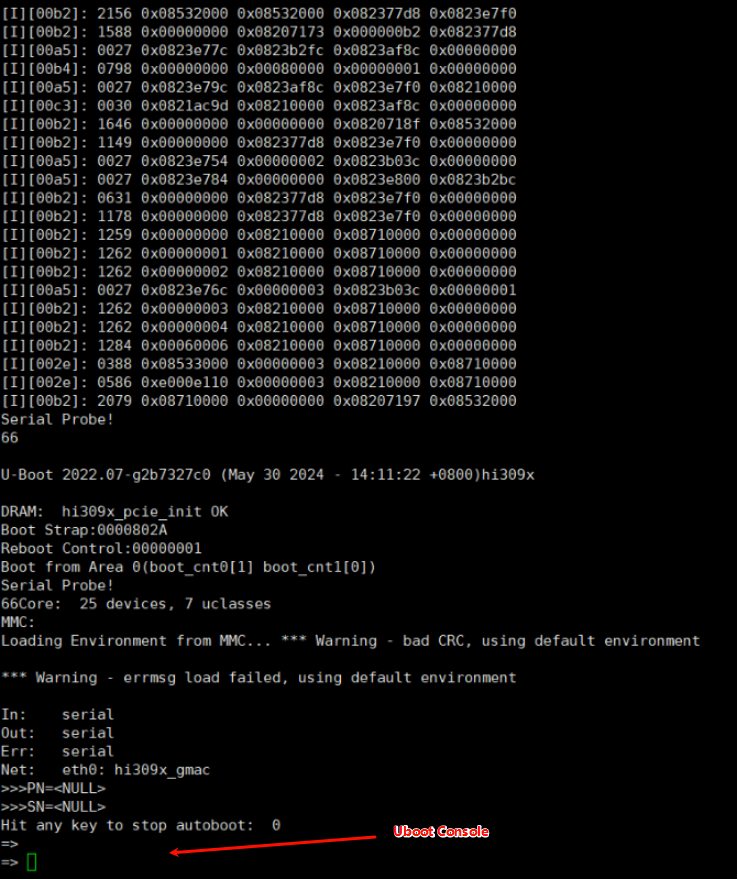
Before U-Boot configuration, ensure that the core board's U-Boot can access the TFTP server hosted on the Ubuntu development server. Install tftpd in the Ubuntu environment.
sudo apt install tftpd-hpa
After the installation, save the initrd_boot.cpio.gz and uImage files, as well as the DTB file (renamed hi3093.dtb) downloaded from the core board to /var/lib/tftproot.
Then, you need to configure the network in VirtualBox Ubuntu VM. For details, refer to "VirtualBox Network Configuration for PC, VM, and Development Board Ping".
Open the VirtualBox network manager and configure the network as follows:
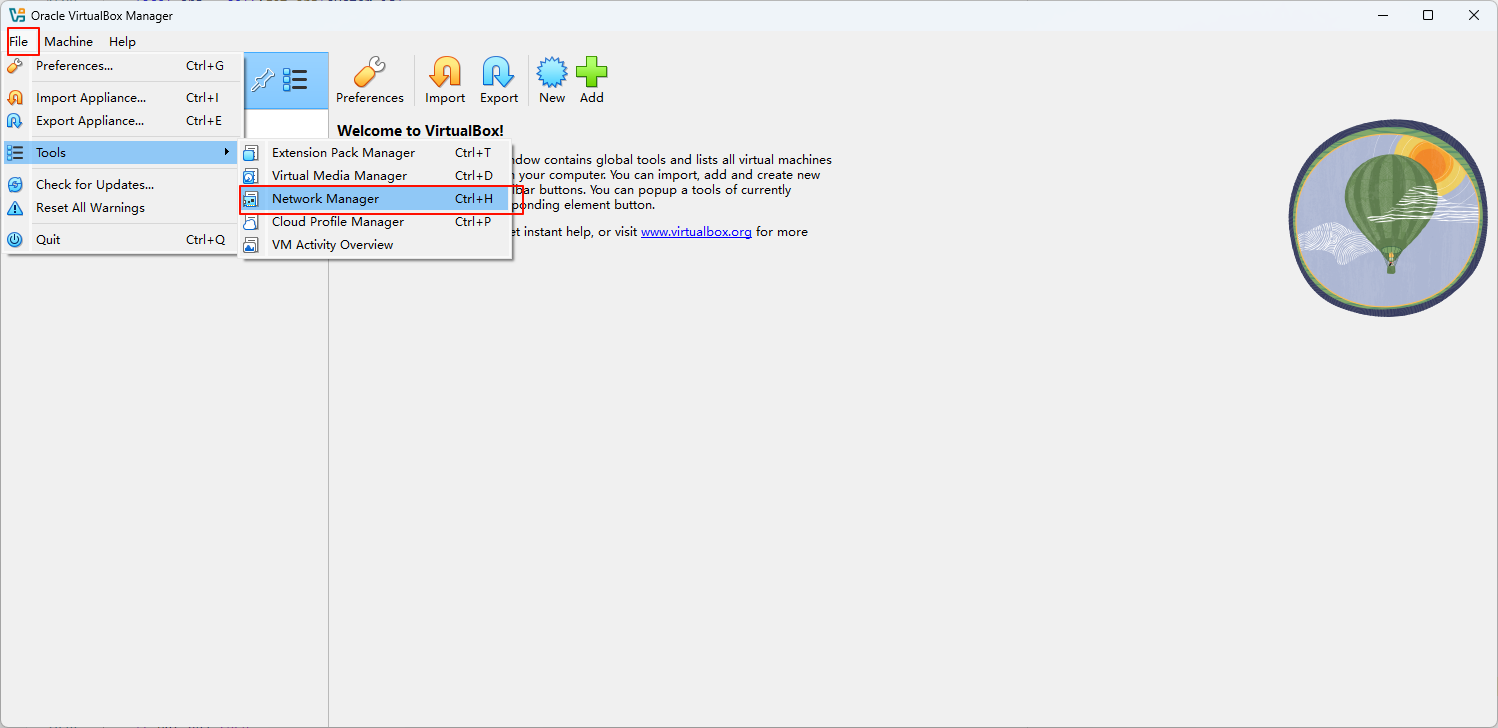
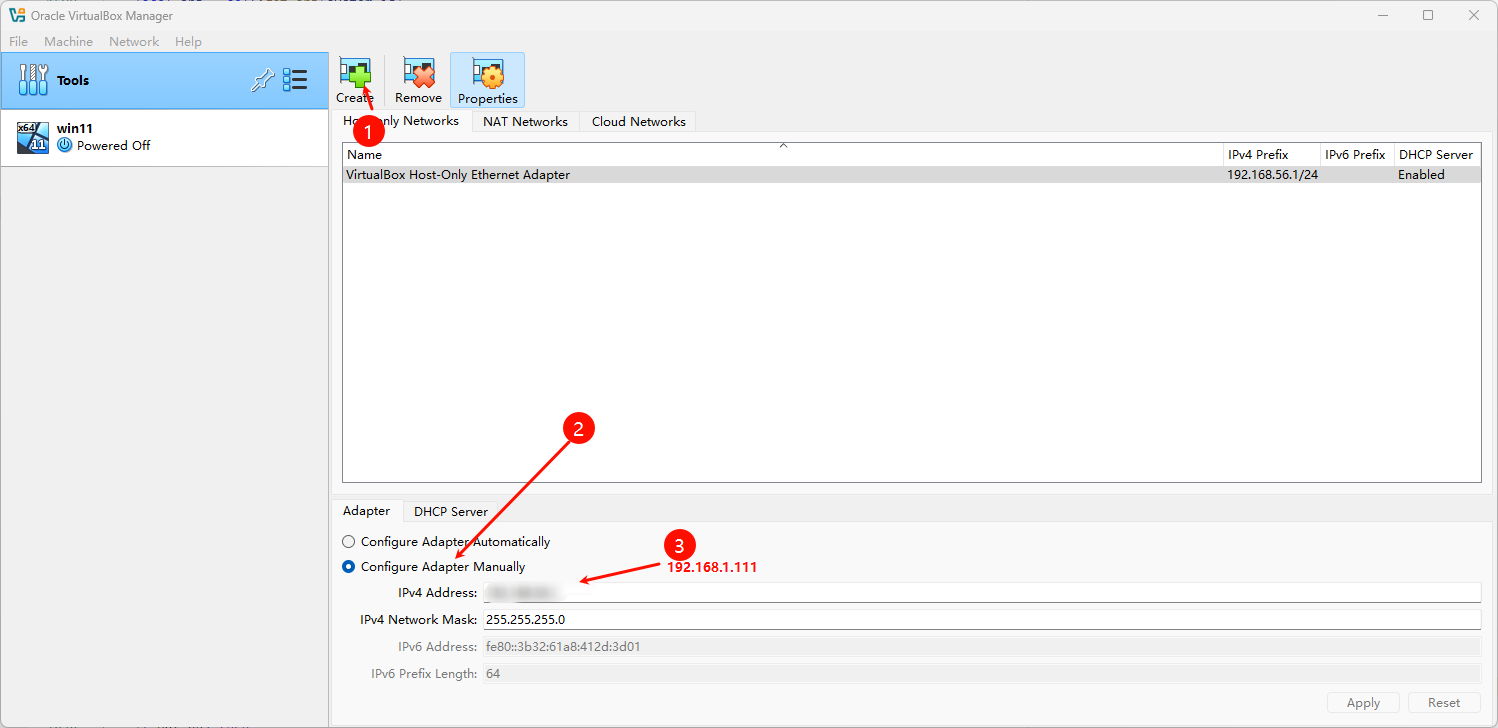
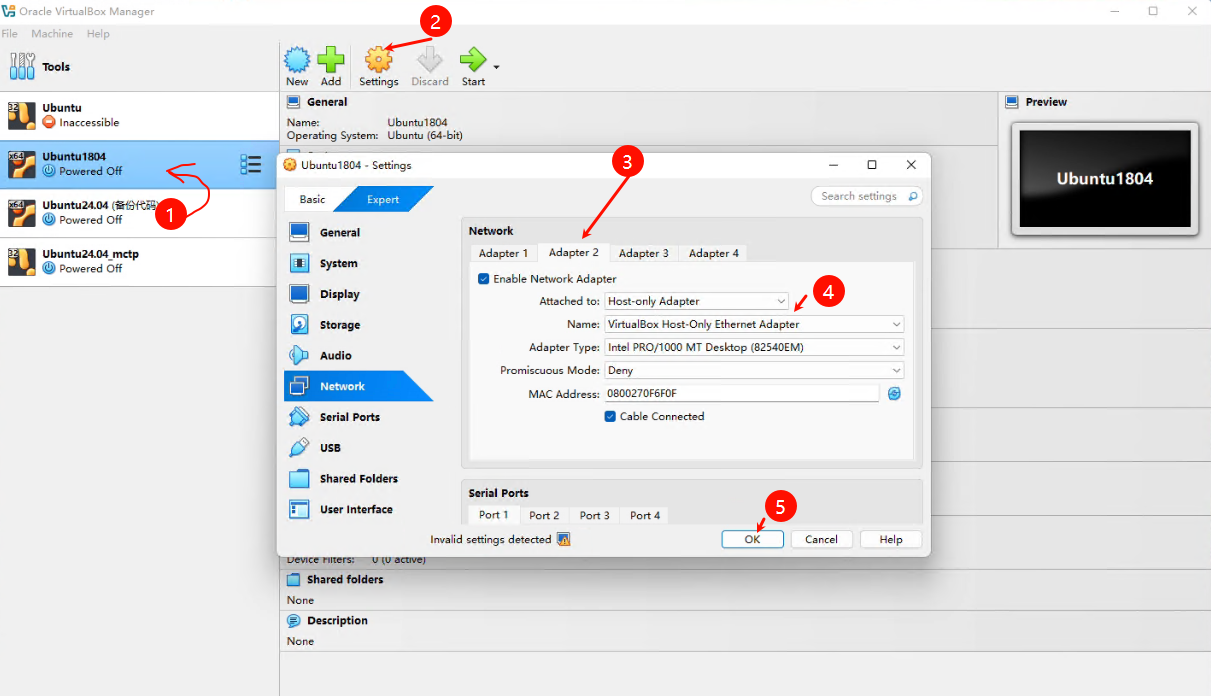
After the preceding configurations are complete, perform a ping test from Windows to ascertain reachability of the network hosting Ubuntu 24.04.
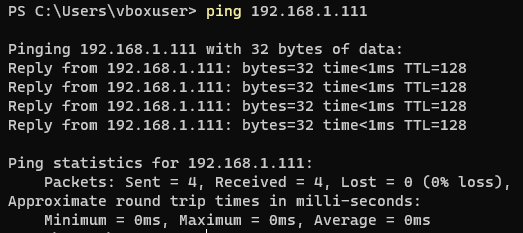
However, U-Boot will still be unable to ping the Ubuntu environment; therefore, a network bridge must be established. In the Windows network connection configuration page, select both the virtual network and the Ethernet connected to the core board, then right-click and select Bridge Connections.
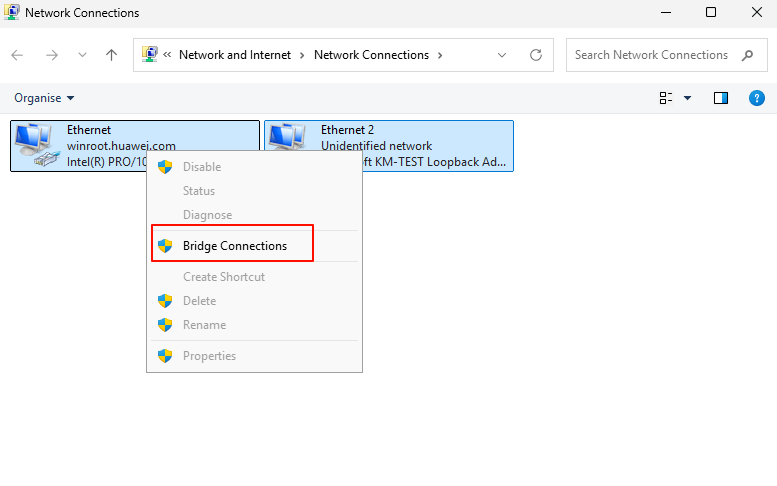
⭐ After the preceding configuration is complete, configure the IP address and gateway of the core board in U-Boot.
setenv ipaddr 192.168.1.123
setenv netmask 255.255.255.0
setenv gateway 192.168.1.1
setenv serverip 192.168.1.111
Ping 192.168.1.111. If the ping fails, check the network connection. For troubleshooting methods, refer to "VirtualBox Network Configuration for PC, VM, and Development Board Ping".
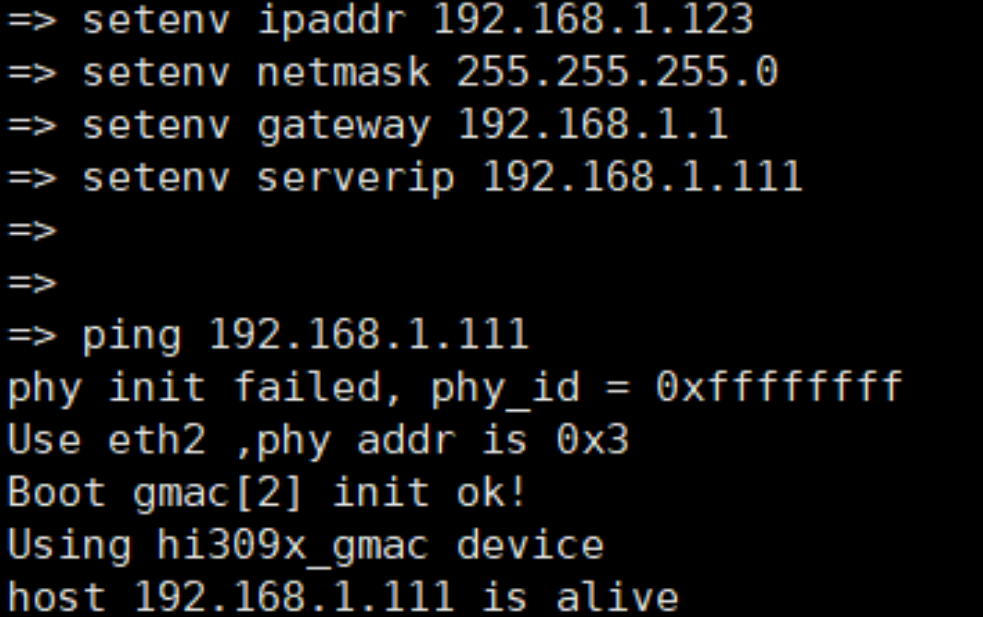
After the communication is established, download the uImage and initrd_boot.cpio.gz files through TFTP in U-Boot.
setenv tftp_dtb "tftp ${dtb_load_addr} hi3093.dtb"
run tftp_dtb # Download the DTB file.
run tftp_network_boot # After the execution, ensure that the download is complete.
run run_linux # After the execution, the system is automatically started.
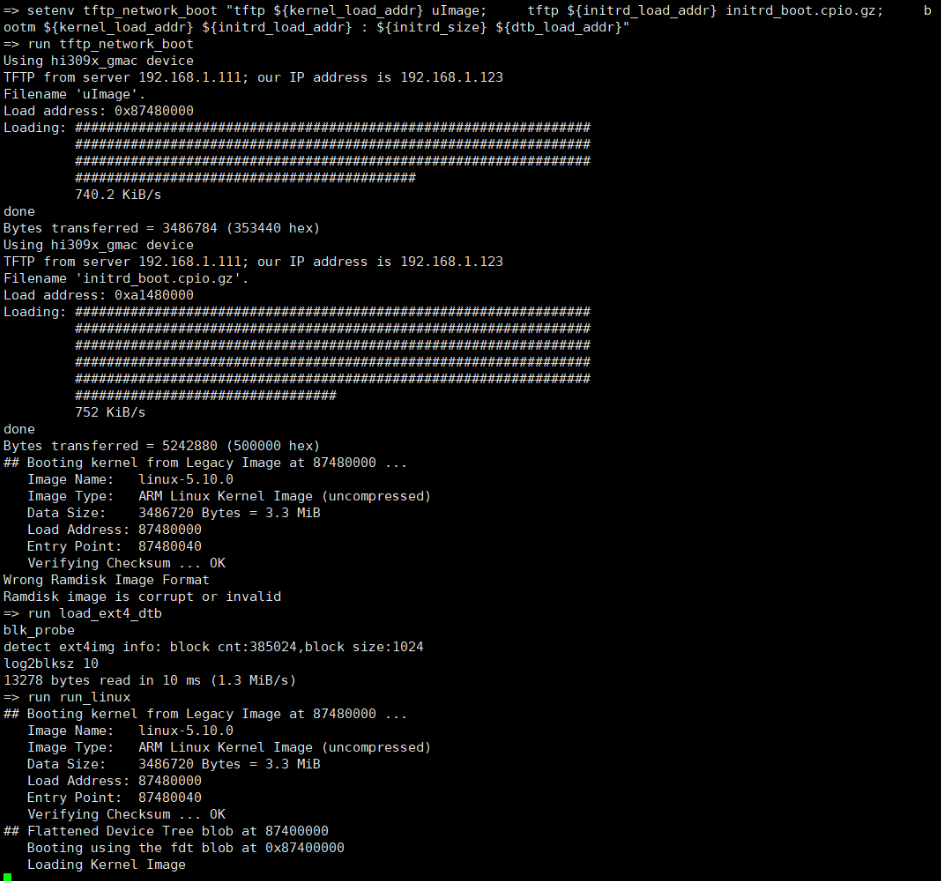
Wait until the openUBMC RTOS is started. The serial port information of openUBMC is displayed.
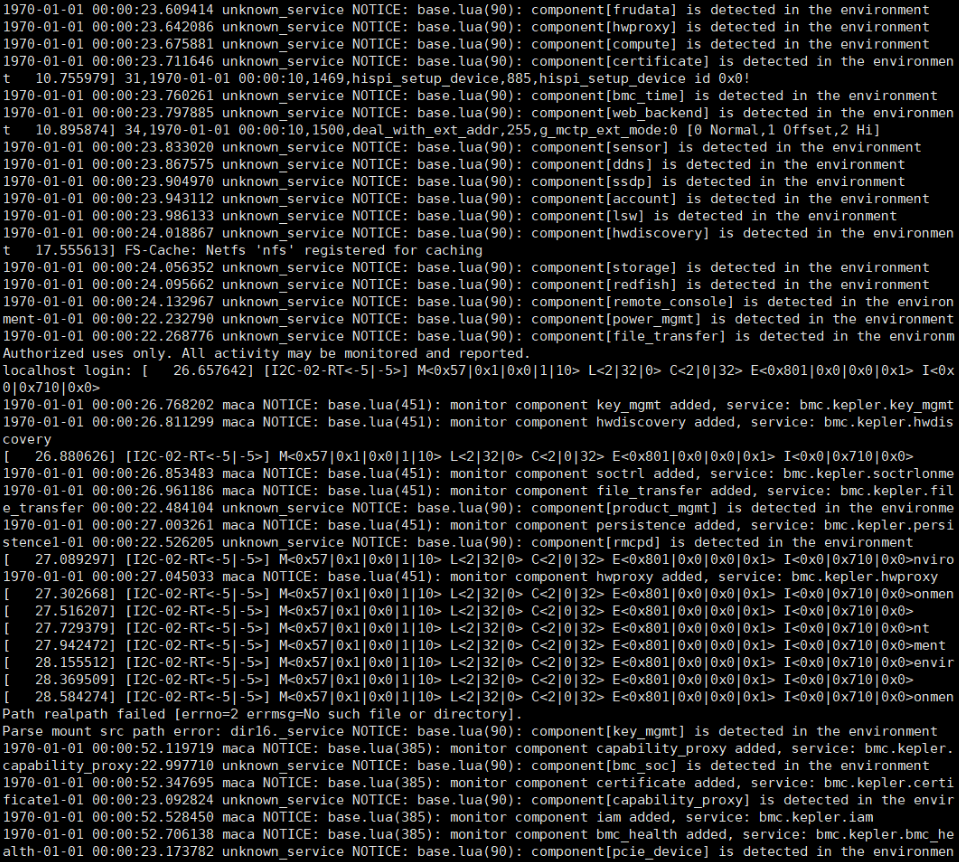
1.2 openUBMC Environment Configuration
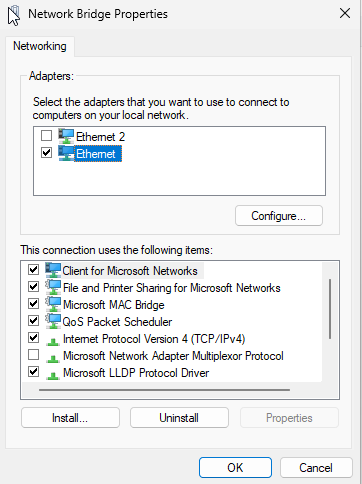
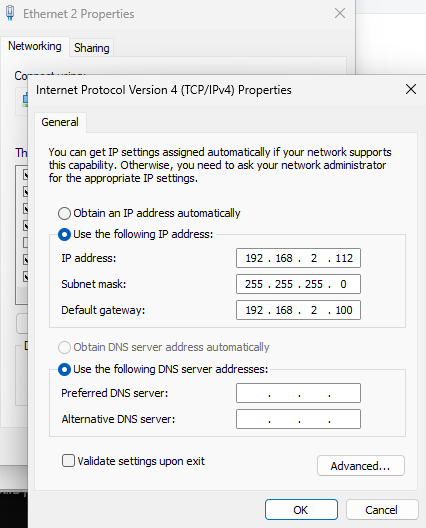
The default IP address of openUBMC is 192.168.2.100, and the gateway is also 192.168.2.100. The IP address is not in the same network segment as the previous configuration. Therefore, we need to modify the Ethernet configuration to log in to openUBMC. Cancel the Ethernet configuration of the core board in the previously configured bridge.
Right-click Ethernet and manually configure the IP address.
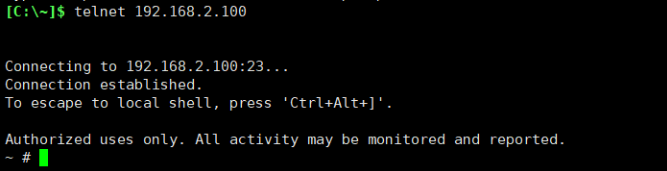
After the configuration, the Telnet connection can be established.
Run the source /etc/profile command to enable utilities such as busctl.
1.2.1 openUBMC Password Generation
The initial BMC does not have a password. You can run the cat /etc/shadow command to check whether there is a long encrypted message. If no, you need to manually add a password.
# Activate busctl.
source /etc/profile

# Change the password.
busctl --user call bmc.kepler.account /bmc/kepler/AccountService/Accounts/2 bmc.kepler.AccountService.ManagerAccount ChangePwd a{ss}
ay 3 Interface Web UserName Administrator ClientAddr 127.0.0.1 10 65 100 109 105 110 64 57 48 48 48
65 100 109 105 110 64 57 48 48 48 corresponds to the ASCII code of password Admin@9000. You can customize the password in this way. However, you cannot log in to the system using SSH because OpenSSH lacks some files; but you can use the IPMI tool to test whether the password is correct.
> .\ipmitool.exe -H 192.168.2.100 -I lanplus -p 623 -U Administrator -P Admin@9000 -C 17 mc info
Device ID                 : 1
Device Revision           : 1
Firmware Revision         : 25.00
IPMI Version              : 2.0
Manufacturer ID           : 2011
Manufacturer Name         : Unknown (0x7DB)
Product ID                : 0 (0x0000)
Product Name              : Unknown (0x0)
Device Available          : yes
Provides Device SDRs      : yes
Additional Device Support :
    Sensor Device
    SDR Repository Device
    SEL Device
    FRU Inventory Device
    IPMB Event Generator
    Chassis Device
Aux Firmware Rev Info     :
    0x00
    0x00
    0x00
    0x01
If the mc info command is executed successfully, the account and password are configured successfully.
1.2.2 Login Through SSH
During the SSH connection, an error is reported even if the correct password is entered. This problem is caused by the PAM authentication failure in OpenSSH.
# Check the SSH dependency in pam.d.
ls -l /data/trust/pam_faillock \
      /lib*/security/pam_bmc_login.so \
      /lib*/security/pam_selinux.so

# Check whether common-auth, common-account, and common-passwd exist.
# Generally, these files exist. If /data/trust/pam_faillock does not exist, you need to manually create it.
touch /data/trust/pam_faillock
chmod 644 /data/trust/pam_faillock
1.2.3 Login through BMC Web
In the initial environment, the BMC certificate is not available. You can use OpenSSL to generate a certificate. Nginx can be started only with a certificate.
Certificate preparation file:
- SSL.p12
Upload SSL.p12 to the /tmp directory of openUBMC using SFTP or other methods, and then import the certificate.
date -s "2025-06-09" && busctl --user call bmc.kepler.certificate /bmc/kepler/CertificateService bmc.kepler.CertificateService ImportCertWithKey a{ss}isss 3 Interface Busctl UserName Administrator ClientAddr 127.0.0.1 1 URI /tmp/SSL.p12 ""
💥 2025-06-09 in the preceding command must be set to a time later than the certificate generation time. Otherwise, an import error occurs. After the import is successful, Nginx and Web can be used properly. Then you can log in to openUBMC on the web page.
1.2.4 Fixing the openUBMC System
In U-Boot, we have configured TFTP to download kernel files. However, this process cannot be solidified. You can upgrade the HPM package on the web page. During the upgrade, the kernel files are burnt to eMMC. In this way, the core board uses the openUBMC system by default after reboot. In addition, the primary and standby partitions are available.
2 QA
2.1 How Do I Roll Back to openEuler?
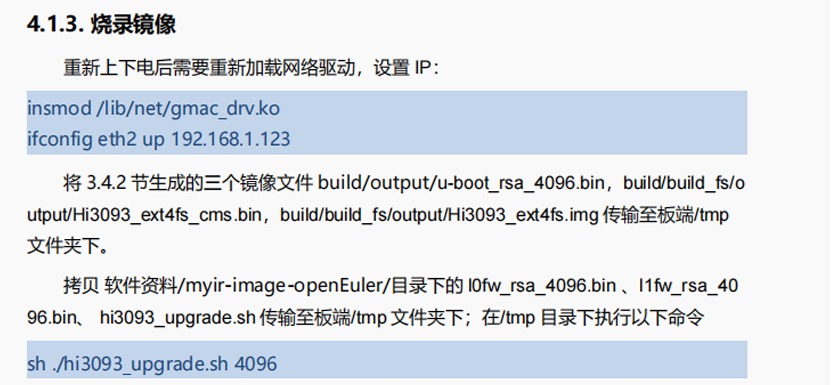
- Access the SPI screen and burn the environment. You can refer to the Hi3093 software development manual.
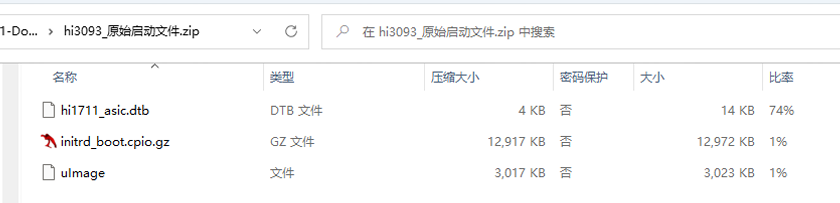
- Download the original boot file package of Hi3093 from https://gitcode.com/fxx551/Hi3093/releases/v1.2.
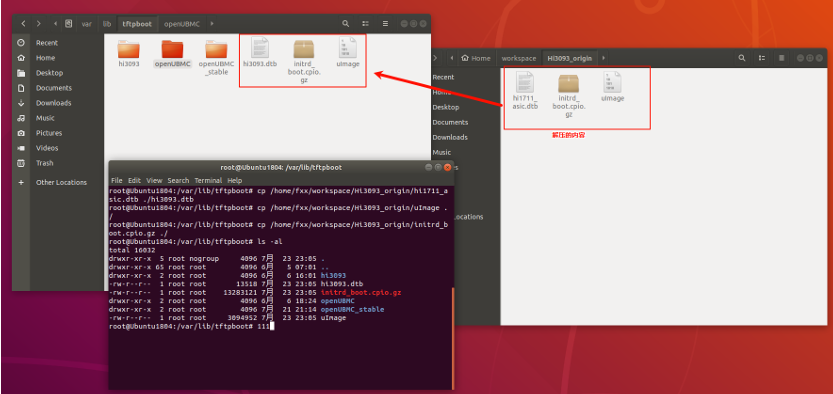
- Decompress the package, upload the content to the Ubuntu VM, and update it to /var/lib/tftpboot.
Note that the hi1711_asic.dtb file name must be changed to hi3093.dtb.
- Enter the U-Boot interface of eMMC, configure the network, and ping the VM. Then, configure tftp_network_boot.
setenv tftp_network_boot 'tftp ${dtb_load_addr} hi3093.dtb;
${kernel_load_addr} uImage;
tftp
tftp ${initrd_load_addr} initrd_boot.cpio.gz;
bootm ${kernel_load_addr} ${initrd_load_addr} : ${initrd_size} ${dtb_load_addr}'
 => ping ${serverip}
 Using hi309x_gmac device
 ## Warning: gatewayip needed but not set
 host 192.168.1.111 is alive
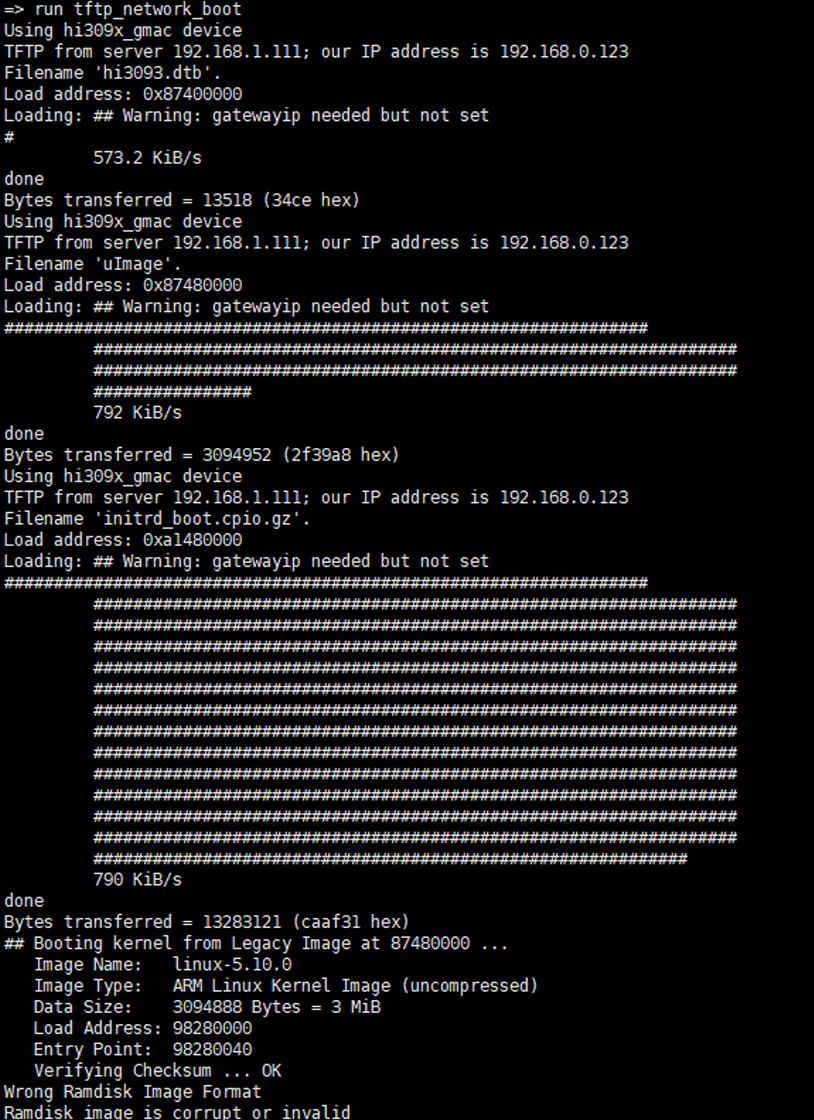
 => run tftp_network_boot
 => run run_linux
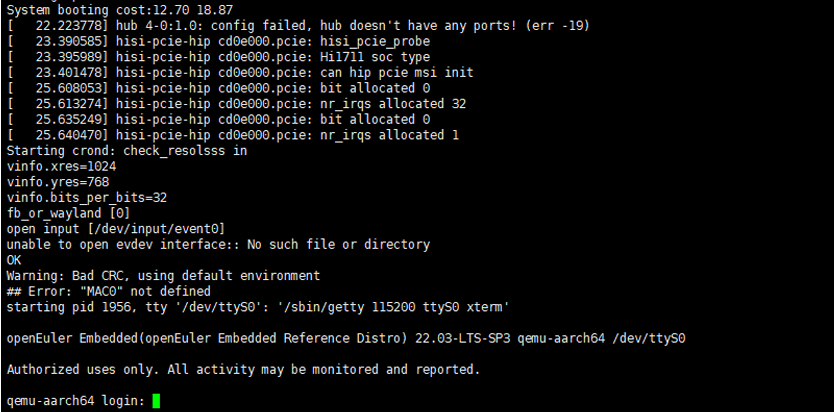
2.2 eMMC Partition Description
2.3 Serial Port Suspended After openUBMC Is Burned,串口卡住
Typically, after openUBMC is started, the serial output is directed to the OS. If redirection of the serial output to the serial console interface is required, run the ipmcset -d serialdir -v 1 command. This command can be input via SSH, or executed via Telnet after source /etc/profile is executed.
【版权声明】Copyright © 2026 openUBMC Community。本文由openUBMC社区首发,欢迎遵照CC-BY-SA 4.0协议规定转载。转载时敬请在正文注明并保留原文链接和作者信息。
【免责声明】本文仅代表作者本人观点,与本网站无关。本网站对文中陈述、观点判断保持中立,不对所包含内容的准确性、可靠性或完整性提供任何明示或暗示的保证。本文仅供读者参考,由此产生的所有法律责任均由读者本人承担。